
The Art of Highlighting: Illuminating Your Features with Precision
Related Articles: The Art of Highlighting: Illuminating Your Features with Precision
Introduction
In this auspicious occasion, we are delighted to delve into the intriguing topic related to The Art of Highlighting: Illuminating Your Features with Precision. Let’s weave interesting information and offer fresh perspectives to the readers.
Table of Content
The Art of Highlighting: Illuminating Your Features with Precision

Highlighting, a cornerstone of makeup artistry, involves strategically applying a luminous product to specific areas of the face to accentuate and enhance natural features. This technique, when executed effectively, can sculpt, define, and illuminate the face, creating a radiant and youthful appearance.
Understanding the Role of Highlighter
Highlighter serves as a versatile tool in the makeup arsenal, capable of achieving diverse effects:
- Sculpting and Defining: By strategically applying highlighter to the high points of the face, one can create an illusion of dimension and depth, enhancing the natural contours. This technique effectively defines cheekbones, brow bones, and the bridge of the nose, adding definition and structure.
- Illuminating and Brightening: The reflective qualities of highlighter create a radiant glow, minimizing the appearance of imperfections and enhancing the overall luminosity of the skin. This effect can make the complexion appear smoother, brighter, and more youthful.
- Drawing Attention: Highlighter acts as a visual focal point, drawing attention to specific areas of the face. This can be utilized to emphasize the eyes, lips, or cheekbones, depending on the desired effect.
Choosing the Right Highlighter
The key to successful highlighting lies in selecting the appropriate product for one’s skin tone and desired effect. Highlighters come in various forms, each with its unique characteristics:
- Powder Highlighters: These are typically finely milled powders that offer a buildable, natural-looking finish. They are ideal for everyday use and can be easily blended for a subtle glow.
- Cream Highlighters: Cream-based highlighters provide a more intense, dewy finish, perfect for creating a dramatic or sculpted look. They are often formulated with moisturizing ingredients, making them suitable for drier skin types.
- Liquid Highlighters: Liquid highlighters offer a blendable, buildable finish, suitable for both subtle and dramatic looks. They can be layered for a more intense glow or used alone for a natural, dewy finish.
- Stick Highlighters: Stick highlighters are convenient and easy to apply, providing precise application and a smooth, blendable finish. They are ideal for on-the-go touch-ups and can be used to create a subtle or dramatic highlight.
Determining the Appropriate Shade
Selecting the right shade of highlighter is crucial for achieving a natural and flattering effect. The ideal shade should complement the skin tone and enhance, not clash with, the natural complexion.
- Fair Skin: Opt for light champagne, pearl, or ivory shades.
- Medium Skin: Choose warm gold, peach, or rose gold shades.
- Olive Skin: Consider warm gold, bronze, or copper shades.
- Dark Skin: Look for shades with a golden, bronze, or copper undertone.
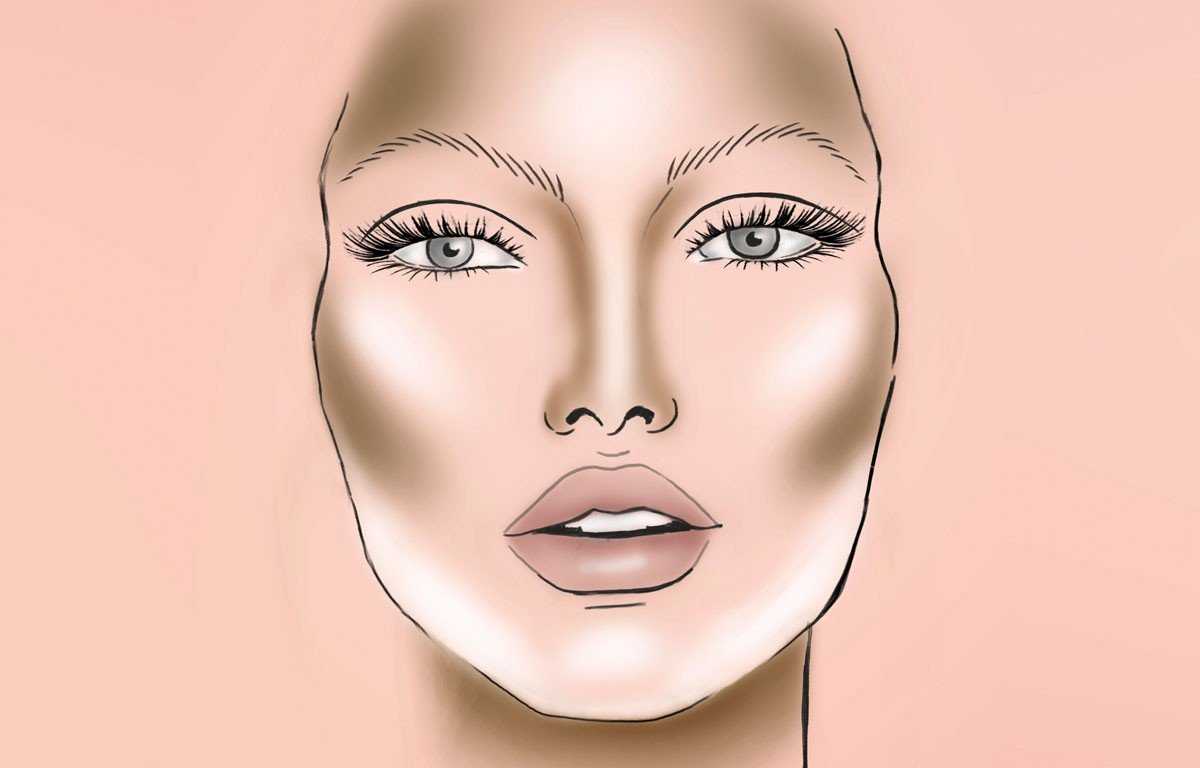
Applying Highlighter with Precision
The application technique significantly impacts the final look. Here’s a step-by-step guide:
- Prep the Skin: Begin with a smooth and hydrated canvas. Apply a moisturizer and allow it to absorb fully before proceeding with makeup.
- Foundation and Concealer: Ensure a flawless base by applying foundation and concealer as usual. This creates a smooth surface for the highlighter to adhere to.
-
Strategic Placement: Apply highlighter to the high points of the face, focusing on areas that naturally catch light:
- Cheekbones: Apply highlighter to the tops of the cheekbones, starting from the outer corner of the eye and blending upwards towards the temple.
- Brow Bone: Place highlighter on the brow bone, blending upwards towards the forehead.
- Cupid’s Bow: Apply a touch of highlighter to the center of the upper lip, enhancing its shape.
- Bridge of the Nose: Apply highlighter down the center of the nose, blending upwards towards the forehead.
- Inner Corner of the Eye: A small amount of highlighter placed in the inner corner of the eye can brighten and open the eyes.
- Blend Seamlessly: Use a fluffy brush or a makeup sponge to blend the highlighter seamlessly into the surrounding skin. Avoid harsh lines or streaks for a natural, radiant finish.
- Set with Powder: If desired, set the highlighter with a translucent powder to prevent creasing and extend its wear.
Tips for Enhancing the Highlighting Experience
- Start with a Light Hand: Apply highlighter in thin layers, building up the intensity gradually. This allows for greater control and prevents an overly dramatic look.
- Consider the Occasion: Adjust the intensity of the highlighter based on the occasion. A subtle glow is appropriate for everyday wear, while a more intense highlight is suitable for evening events.
- Experiment with Placement: Don’t be afraid to experiment with different placement techniques to find what works best for your face shape and desired effect.
- Choose the Right Tool: Select a brush or sponge that is appropriate for the type of highlighter you are using. A fluffy brush is ideal for powder highlighters, while a sponge works well with cream or liquid formulas.
- Practice Makes Perfect: Mastering the art of highlighting takes time and practice. Don’t be discouraged if your initial attempts are not perfect. With consistent practice, you will develop a natural eye for achieving the desired effect.
FAQs about Highlighter Application
Q: Can I use highlighter on my entire face?
A: While highlighter can be used on the entire face for a dewy, luminous effect, it’s generally recommended to focus on specific areas to achieve a sculpted and defined look.
Q: Can I use highlighter on my eyelids?
A: Yes, applying a light touch of highlighter to the center of the eyelid can brighten and enhance the eye area. However, avoid using shimmery or glittery highlighters on the eyelid, as they can accentuate fine lines.
Q: How do I choose the right highlighter for my skin tone?
A: Select a highlighter with an undertone that complements your natural skin tone. Refer to the shade recommendations for different skin tones provided earlier in the article.
Q: Can I use highlighter on my body?
A: Absolutely! Highlighter can be used to enhance the décolletage, shoulders, or legs, creating a radiant and glowing effect.
Q: Should I use highlighter before or after setting powder?
A: It is generally recommended to apply highlighter after setting powder, as this helps to prevent it from blending into the powder and creating a chalky appearance.
Conclusion
Mastering the art of highlighting is a journey of experimentation and exploration. By understanding the principles of strategic application, choosing the right products, and embracing a light touch, one can unlock the transformative power of highlighter to enhance natural features, illuminate the complexion, and create a radiant, sculpted look. Whether aiming for a subtle glow for everyday wear or a dramatic, sculpted effect for special occasions, highlighter remains a valuable tool in the makeup artist’s arsenal.


Closure
Thus, we hope this article has provided valuable insights into The Art of Highlighting: Illuminating Your Features with Precision. We hope you find this article informative and beneficial. See you in our next article!